Brass tap fittings are essential connectors used to attach a garden hose to a tap or faucet. Made from brass, a durable and corrosion-resistant metal, these fittings are designed to withstand the elements, ensuring long-lasting, reliable performance in outdoor environments. Brass tap fitting is one of the most popular and reliable fittings for this purpose. Brass is a durable, corrosion-resistant material that provides a secure connection, making it an ideal choice for outdoor plumbing and irrigation systems.
In this article, we’ll explore how to properly fit a hose to a tap using a brass tap fitting and the best methods for joining hoses together.
Understanding Brass Tap Fittings
Types of Brass Tap Fittings
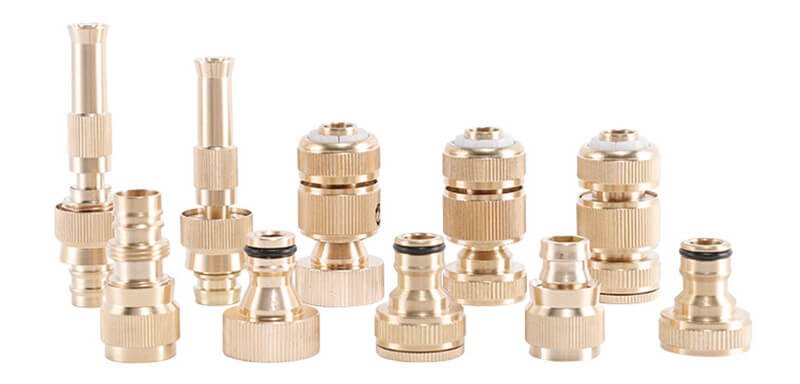
Brass tap fittings come in various designs to suit different needs. The most common types include:
- Male and Female Threaded Fittings: These are the most traditional type, where the fitting screws onto the male or female threads of a tap or hose. Male fittings have external threads, while female fittings have internal threads.
- Quick-Connect Fittings: A more modern solution, quick-connect fittings allow for easy, tool-free attachment and removal. With a simple push-and-click mechanism, these fittings are ideal for users who need to frequently connect and disconnect their hoses.
Why Choose Brass?
Brass is widely regarded as an ideal material for tap fittings due to its strength and resistance to corrosion. Unlike plastic fittings, brass is much more durable and less likely to crack or wear down over time, especially when exposed to extreme temperatures or outdoor conditions. Additionally, brass fittings provide a tight, leak-proof seal, which is essential for preventing water wastage.
Common Uses of Brass Tap Fittings
Brass tap fittings are not just for garden hoses. They are also used in various irrigation systems, pressure washers, and outdoor plumbing applications. Whether you’re attaching a sprinkler system, a pressure washer hose, or connecting multiple hoses together, a brass tap fitting offers the reliability and performance needed for a secure connection.
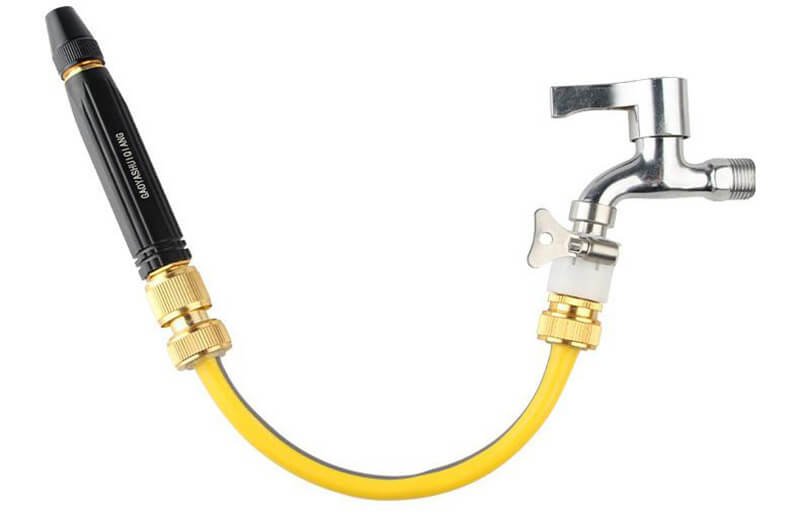
How to Fit a Hose to a Tap Using a Brass Tap Fitting
Attaching a garden hose to a tap using a brass tap fitting is a simple process, but it’s important to do it correctly to ensure a secure, leak-free connection. Below is a step-by-step guide that will walk you through the process of fitting your hose to a tap using a brass fitting.
Step 1: Choose the Right Brass Tap Fitting
Before you begin, it’s important to select the correct brass tap fitting based on the size of your tap and hose.
- Measure your tap’s thread: Most taps have a standard size, but it’s always a good idea to measure the thread diameter of your tap to ensure the brass fitting will fit correctly.
- Choose the right fitting type: You can choose from male or female threaded fittings or quick-connect fittings, depending on your hose and tap design.
Make sure that the fitting you choose matches the thread type and size of both your tap and hose.
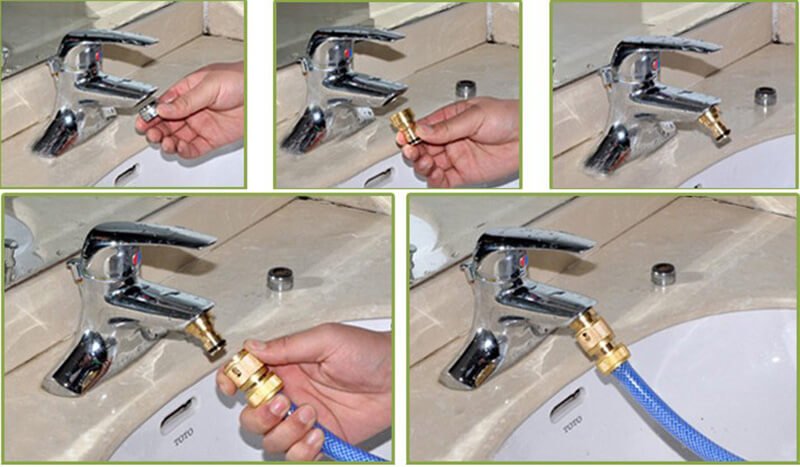
Step 2: Attach the Brass Fitting to the Tap
Once you’ve selected the right brass fitting, it’s time to attach it to your tap. Here’s how:
- Screw the fitting onto the tap: If you’re using a male-threaded fitting, simply screw it onto the female threads of the tap. If your fitting is female-threaded, screw it onto the male threads of the tap. Tighten it by hand until it’s secure.
- Use sealing tape if necessary: For extra security and to prevent leaks, wrap plumber’s tape (Teflon tape) around the threads of the tap before attaching the fitting. This tape helps create a tight seal and prevents water from leaking at the connection.
Step 3: Connect the Hose to the Brass Fitting
Now that the brass fitting is securely attached to your tap, it’s time to connect the hose.
- Screw the hose onto the fitting: Take the end of your garden hose and screw it onto the other side of the brass fitting. Again, ensure that the threads match (male or female) and tighten by hand.
- Ensure a snug fit: Be sure that the connection is tight enough to prevent leaks but avoid over-tightening, which can damage the threads or fitting.
If you’re using a quick-connect fitting, simply push the hose into the fitting and ensure it clicks into place. These fittings are designed for quick and easy connections without the need for threading.
Step 4: Test for Leaks
Once the hose is securely connected, it’s important to check for leaks before using the hose.
- Turn on the water: Slowly open the tap to let water flow through the hose.
- Check for any drips: Inspect both the hose connection and the brass tap fitting for any signs of water leakage.
If you notice any leaks, tighten the connection a bit more or add more plumber’s tape to the threads to ensure a proper seal.
Common Mistakes to Avoid
To ensure a hassle-free setup, here are some common mistakes to avoid when fitting a hose to a tap:
- Over-tightening the fitting: While it’s important to tighten the fitting securely, over-tightening can damage the threads and lead to leaks.
- Using the wrong size fitting: Ensure the brass tap fitting matches the size and thread type of your tap and hose. Using the wrong size can result in an insecure connection and potential leaks.
- Neglecting sealing tape: If you’re not using a quick-connect fitting, always apply plumber’s tape to the threads of the tap to prevent water leakage.
By following these simple steps, you’ll have your hose securely connected to the tap in no time, ready for all your gardening or outdoor watering tasks!
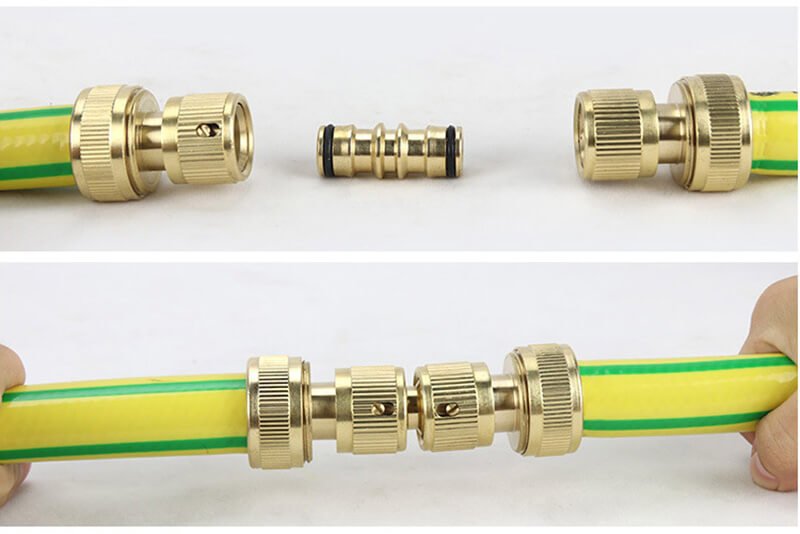
How to Join Two Hoses Together
Connecting two garden hoses together is a great way to extend the reach of your watering system. Whether you’re watering a large garden or need extra length for other outdoor tasks, joining hoses properly ensures a secure and leak-free connection. Here’s a step-by-step guide on how to join two hoses together.
Step 1: Choose the Right Hose Connector
Before you begin, make sure you have the appropriate hose connector. There are several types of connectors available, but the most common for joining two hoses are:
- Barbed Hose Connectors: These connectors have a barbed end that fits into the hose and is secured with a hose clamp. It provides a tight and secure connection.
- Quick-Connect Hose Couplings: These are designed for easy attachment and detachment. Simply push the hoses together and click into place for a secure, tool-free connection.
- Screw-on Connectors: For a more traditional approach, screw-on connectors offer a reliable connection by screwing two hoses into a female-to-female coupling.
Step 2: Prepare the Hose Ends
To ensure a tight connection, you need to prepare the hose ends:
- Cut the hoses cleanly: If the ends of your hoses are frayed or damaged, use a sharp hose cutter to make a clean cut. This will help the connector fit securely onto the hose.
- Inspect the hose ends: Make sure that the ends of the hoses are free of debris or dirt that could affect the connection.
Step 3: Attach the Hose Connector
Depending on the type of connector you are using, follow these steps:
- For Barbed Hose Connectors:
- Insert the barbed end of the connector into the cut end of one hose.
- Slide a hose clamp over the hose and tighten it with a screwdriver to hold the hose securely in place.
- For Quick-Connect Hose Couplings:
- Simply align the connector with the hose end and push it into place. The coupling should click, ensuring a secure connection.
- For Screw-on Connectors:
- Screw one hose into the female coupling of the connector and repeat for the second hose. Tighten both connections by hand, ensuring a snug fit.
Step 4: Check the Connection
After joining the hoses, it’s important to test the connection:
- Turn on the water: Slowly open the faucet to allow water to flow through the hoses.
- Inspect for leaks: Check both ends of the connector and the hose for any signs of water leakage. If you notice any leaks, tighten the connector or reattach it properly.
Common Mistakes to Avoid
When joining hoses together, avoid these common mistakes to ensure a proper connection:
- Not using a hose clamp with barbed connectors: A hose clamp ensures that the barbed connector stays securely in place. Without it, the connection may loosen over time.
- Forcing the connector onto the hose: If the connector doesn’t fit easily, don’t force it. Make sure you are using the correct size connector for your hoses.
- Neglecting to check for leaks: Always test the connection before using the hoses for watering. Leaks can waste water and cause unnecessary mess.
By following these simple steps, you’ll have your hoses securely joined and ready to use, whether for garden watering, cleaning, or any other outdoor task.
Tips for Maintaining Hose Connections
Proper maintenance of hose connections ensures a long-lasting and leak-free watering system. Here are some helpful tips to maintain your hose fittings and connections in optimal condition:
1. Regularly Inspect Connections for Leaks
Leaks are one of the most common problems with hose connections. Over time, fittings can loosen or become damaged, leading to water wastage. Regularly check both the tap connection and the hose-to-hose connections for signs of leakage. If you notice any drips, tighten the connection or replace any worn-out parts like hose washers or plumber’s tape.
2. Clean the Hose Fittings
Dirt and debris can build up around the hose fittings, causing a poor seal and potential leaks. To keep your connections in good working order, clean the fittings and hose ends regularly. Use a soft cloth or brush to remove dirt, mud, or leaves from the fittings and hose threads. This will ensure a tight connection when reattaching hoses.
3. Store Hoses Properly
When not in use, store your hoses properly to prevent damage to the fittings. Coil the hose and avoid leaving it in direct sunlight for long periods, as this can cause the hose material to weaken and fittings to become brittle. Consider using a hose reel or storage rack to keep everything organized and protected from the elements.
4. Lubricate Threaded Connections
To prevent the threads from wearing down and causing leaks, you can apply a small amount of lubricant or plumber’s grease to the threads of your brass tap fitting or connector. This helps the fittings screw on and off more easily and reduces the chance of damage to the threads.
5. Replace Worn or Damaged Parts
Over time, parts like hose washers, connectors, and clamps may wear out or become damaged. Always replace damaged washers or connectors as soon as you notice a problem. Doing so can prevent water from leaking and help avoid costly repairs in the future.
Conclusion
Maintaining a secure and leak-free hose connection is essential for a smooth gardening or outdoor watering experience. Whether you’re connecting a hose to a tap using a brass tap fitting or joining two hoses together, following the right steps ensures your hoses will function effectively for years to come.
By selecting the right hose fittings, regularly inspecting and cleaning your connections, and storing your hoses properly, you can prevent leaks, improve performance, and extend the lifespan of your equipment.