In industrial applications, pneumatic systems play a crucial role in powering machinery and equipment. These systems use compressed air to generate motion and perform tasks like lifting, pushing, and moving objects. Whether in factories, construction sites, or other sectors, pneumatic systems are highly efficient and reliable. However, the key to ensuring these systems work optimally lies in the pneumatic fittings and connectors that make up the network.
Choosing the right pneumatic fittings is critical for maintaining system efficiency, preventing leaks, and ensuring long-term reliability. Incorrect or mismatched fittings can result in air loss, inefficient operation, and even equipment damage. In this article, we’ll explore how to choose the best pneumatic fittings for your specific needs. We’ll cover key factors, common mistakes, and best practices, ensuring you make informed decisions for your pneumatic systems.
What Are Pneumatic Fittings?
Definition and Function of Pneumatic Fittings
Pneumatic fittings are essential components that connect various parts of a pneumatic system. They are used to connect pipes, tubes, and hoses, ensuring a secure and leak-proof connection. These fittings help to direct the flow of compressed air, linking different pieces of equipment within the system, such as valves, actuators, and compressors.
In essence, pneumatic fittings serve as the “joints” that hold the system together, maintaining the flow of air while withstanding pressure and environmental stresses.
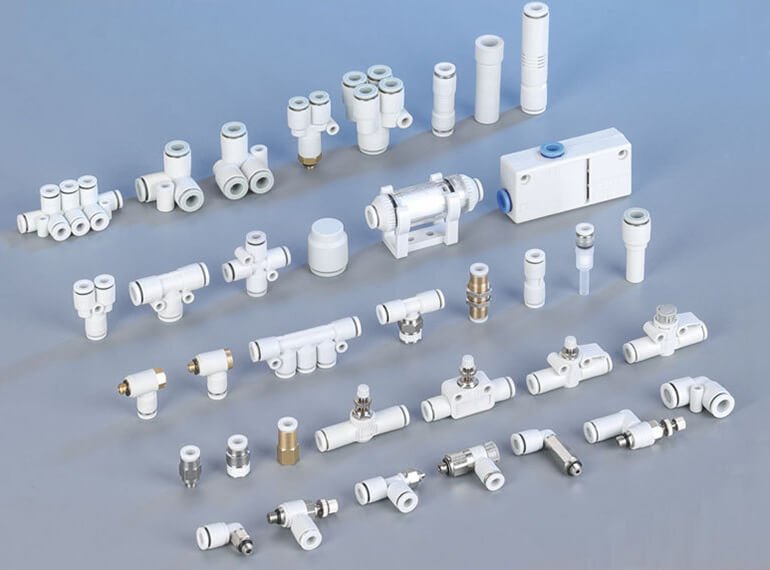
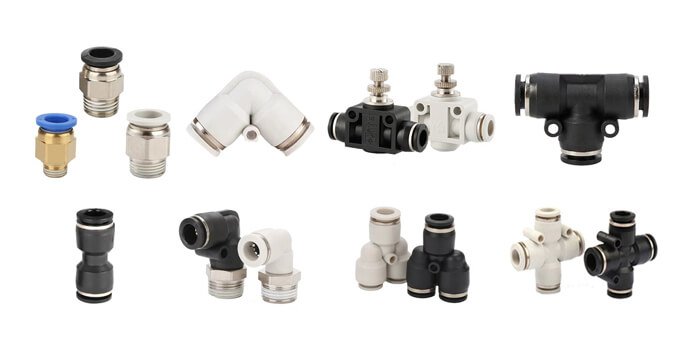
Types of Pneumatic Fittings
There are several types of pneumatic fittings, each designed for different applications. Here are some of the most common:
- Push-In Fittings: These are easy to install and remove, making them ideal for quick and flexible setups. Push-in fittings allow tubing to be inserted into the fitting with minimal effort, providing a secure connection without the need for tools.
- Threaded Fittings: These fittings are commonly used in applications that require a stronger, more permanent connection. Threaded fittings are screwed into place, providing a tight seal that can handle higher pressures.
- Barbed Fittings: These are primarily used in low-pressure applications. Barbed fittings grip tubing securely by inserting the barbs into the tubing, making them ideal for flexible or softer materials.
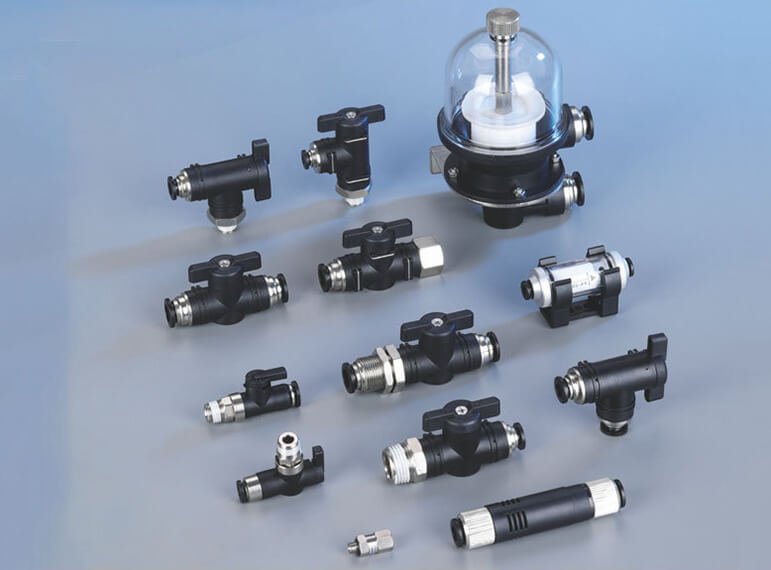
Materials Used in Pneumatic Fittings
Pneumatic fittings are made from a range of materials, each suited for different environments and needs:
- Brass: Known for its corrosion resistance and ease of machining, brass is often used in general-purpose applications.
- Stainless Steel: Stainless steel is preferred for high-pressure systems and harsh environments due to its strength, durability, and resistance to corrosion.
- Plastic: For applications where weight and cost are important, plastic fittings are often used. They offer a good balance of performance and cost-effectiveness in low-pressure applications.
Understanding the types and materials of pneumatic fittings is essential for selecting the correct fitting for your system’s requirements. By choosing the right type, you ensure better performance, durability, and safety in your pneumatic setup.
Factors to Consider When Choosing Pneumatic Fittings
When selecting pneumatic fittings, several important factors must be considered to ensure optimal system performance, safety, and longevity. Below, we outline the most critical aspects to keep in mind when making your choice.
1.1 Compatibility with Piping System
The first factor to consider when choosing pneumatic fittings is their compatibility with your piping system. Pneumatic fittings come in various designs to suit different types of pipes and hoses. These include metal pipes, plastic tubing, and composite materials.
- Pipe Size and Material: The fitting must match the size and material of the pipe or hose it will connect to. For instance, a threaded fitting may be needed for metal pipes, while a push-in fitting is typically more suited to plastic or rubber hoses.
- Connection Type: Ensure the fitting is designed for the type of connection you need. Push-to-connect fittings are perfect for flexible plastic tubing, while threaded fittings are ideal for rigid metal pipes.
Having the right size and material ensures a secure and leak-proof connection, preventing air loss and reducing the risk of system failure.
1.2 Operating Pressure and Temperature Range
Each pneumatic system operates under specific pressure and temperature conditions. It’s important to select fittings that can withstand these factors without degrading or failing.
- Pressure Rating: Pneumatic fittings are rated for different levels of pressure. Using a fitting that cannot handle the pressure requirements of your system can lead to leaks, blowouts, or premature wear. Always check the pressure rating on the fitting to ensure it aligns with your system’s demands.
- Temperature Resistance: Different materials have different temperature tolerances. If your system operates in high heat or extreme cold, select fittings that are specifically designed for such conditions. For example, stainless steel fittings can tolerate higher temperatures compared to plastic alternatives.
Choosing fittings with the correct pressure rating and temperature tolerance ensures that the system remains safe and efficient over time.
1.3 Airflow and Capacity
The airflow through a pneumatic system plays a significant role in its overall efficiency. Pneumatic fittings impact the air flow rate, and selecting the wrong fitting can cause restrictions or bottlenecks in the system.
- Flow Rate: If your application requires high air volumes, it’s essential to choose fittings that support high flow rates. Some fittings are designed with features like larger internal diameters or smooth internal surfaces to minimize air resistance.
- Capacity: Ensure that the fitting can handle the air volume required by your equipment without causing an increase in backpressure. If the fitting is too small for the system, it will result in inefficiency and higher energy consumption.
Selecting the right pneumatic fittings based on their flow capacity helps to maintain optimal air pressure and ensures that all components of the system receive the appropriate amount of air.
1.4 Type of Connection
Pneumatic fittings come in a variety of connection types, each suited for different needs. Choosing the right connection type can save time and effort during installation and maintenance.
- Threaded Fittings: These are suitable for more permanent connections. Threaded fittings provide a strong, secure seal but require tools for installation and removal. They are ideal for high-pressure or high-flow applications where a robust connection is needed.
- Push-In Fittings: These are quick and easy to install, making them ideal for systems that require frequent changes or reconfigurations. Push-in fittings do not need special tools and are often used in low-pressure systems.
- Quick-Connect Fittings: These fittings are designed for applications where fast, temporary connections are needed. They allow users to connect or disconnect components rapidly and without tools.
Each type of connection serves a specific purpose, and the choice depends on the installation method and the application requirements.
1.5 Durability and Material Selection
The material of the fitting plays a significant role in its durability and resistance to wear and tear. Fittings are available in a range of materials, including brass, stainless steel, and plastic. The material you choose should depend on the conditions in which the fitting will be used.
- Corrosion Resistance: If your pneumatic system is exposed to moisture, chemicals, or high humidity, corrosion resistance becomes a key consideration. For such environments, stainless steel fittings are often the best choice due to their excellent resistance to corrosion.
- Strength: Some applications, especially those with high pressures or heavy machinery, require fittings made from materials with higher strength. Brass and stainless steel offer better durability under these conditions compared to plastic.
- Environmental Suitability: Consider whether the fitting will be exposed to outdoor conditions, extreme temperatures, or harsh chemicals. Select materials that are compatible with the operating environment to ensure long-term durability and performance.
Choosing fittings made from the appropriate material ensures that your pneumatic system is resilient and long-lasting, even in demanding conditions.
1.6 Cost and Budget
Finally, while it is important to choose high-quality pneumatic fittings, cost should also be considered. Depending on the application, some fittings may offer similar performance at different price points.
- Budget-Friendly Options: For low-pressure or low-demand systems, plastic fittings or basic brass fittings might be sufficient and more affordable. However, they may not be suitable for more demanding environments.
- Investment in Quality: For high-pressure systems or systems that require long-term reliability, investing in more durable fittings made from stainless steel or high-performance alloys may be necessary.
Ultimately, balancing cost with performance and longevity will help you get the best value for your investment.
Common Mistakes to Avoid When Choosing Pneumatic Fittings
Choosing the right pneumatic fittings can be challenging, and even small mistakes can lead to costly repairs, inefficiencies, or system failures. To help ensure you make the best choice, here are some common mistakes to avoid when selecting pneumatic fittings.
1.1 Overlooking Compatibility with Piping System
One of the most frequent mistakes is failing to ensure that the fittings are compatible with the rest of the system. Pneumatic fittings must match the size, material, and connection type of your pipes, hoses, or tubes.
- Wrong Size: Choosing a fitting that doesn’t fit the pipe size properly can lead to air leaks and poor performance. Always double-check the inner diameter and outer diameter of the tubing and ensure they match the fitting specifications.
- Material Mismatch: Different materials have different properties, such as flexibility and durability. Using a plastic fitting with metal piping or vice versa can create weak spots that are prone to failure, especially under pressure.
Always confirm that the fittings and pipes are fully compatible to avoid costly repairs or downtime.
1.2 Ignoring Pressure and Temperature Ratings
Many users neglect to check the pressure rating and temperature limits of the fittings they select. This is a critical mistake, as exceeding the maximum pressure or temperature ratings can lead to fitting failures or system malfunctions.
- Pressure Mismatch: Each pneumatic fitting is designed for a specific pressure range. Using a fitting rated for lower pressure in a high-pressure system can result in leaks, ruptures, or blowouts. Ensure that the fitting’s pressure rating matches or exceeds the requirements of your system.
- Temperature Extremes: Similarly, selecting a fitting without considering the operating temperature can cause it to deform, crack, or fail prematurely. Fittings made from materials like plastic are not suitable for high-temperature environments, while metal fittings may be better for extreme conditions.
Always check the pressure and temperature specifications to ensure they are suitable for your system’s operating conditions.
1.3 Choosing Fittings Based Only on Cost
While budget is an important consideration, it should never be the only factor in your decision-making process. Cheap fittings may seem appealing at first, but they can lead to bigger issues down the line.
- Quality vs. Price: Low-cost fittings may be made from inferior materials, have poor sealing properties, or be more prone to wear and tear. Over time, these fittings can result in leaks, downtime, and more expensive repairs.
- Long-Term Costs: Fittings that are initially cheaper may not perform as well in the long run, especially in high-demand environments. Opting for high-quality fittings can help prevent costly maintenance and downtime, offering a better return on investment.
It’s important to balance cost with quality to ensure the long-term performance of your pneumatic system.
1.4 Ignoring Proper Installation Procedures
Proper installation of pneumatic fittings is just as important as selecting the right one. Neglecting the correct installation procedures can cause air leaks, reduced system efficiency, and even premature failure.
- Incorrect Tightening: Over-tightening or under-tightening fittings can cause damage to threads, leading to leaks or poor connections. Always follow manufacturer guidelines on torque and tightening procedures.
- Lack of Proper Tools: Using the wrong tools or not using tools at all can lead to improper installation and potential damage to the fitting or tubing. Be sure to use the appropriate tools for each type of fitting to ensure a secure, reliable connection.
- Failure to Inspect: Failing to inspect the fittings after installation can result in unnoticed leaks or misalignments that degrade system performance. Regular inspections help catch problems before they become serious.
Always follow the correct installation procedures to ensure your pneumatic fittings work effectively and efficiently.
1.5 Neglecting Maintenance and Regular Checks
Many users make the mistake of neglecting regular maintenance or routine checks after fitting installation. Over time, fittings can degrade, especially in harsh environments, which can lead to performance issues.
- Wear and Tear: Fittings exposed to high pressures, temperature extremes, or harsh chemicals can suffer from erosion and corrosion, affecting their functionality. Regularly checking the condition of fittings can help identify issues before they escalate.
- Failure to Replace Worn Fittings: Over time, gaskets and seals can wear out, leading to air leakage. Replace these components as part of your regular maintenance schedule to keep the system running smoothly.
- Leak Testing: Regular leak testing is crucial to identify small issues before they become major problems. Ensuring that all fittings are properly sealed will help maintain system efficiency.
Don’t overlook the importance of routine maintenance and periodic checks to extend the life of your fittings and keep your system in top condition.
How to Install Pneumatic Fittings Correctly
Installing pneumatic fittings properly is essential to ensuring the safety, efficiency, and longevity of your pneumatic system. A correct installation ensures secure connections, minimizes the risk of air leaks, and helps maintain consistent system performance. Below are the key steps and tips for installing pneumatic fittings correctly.
1.1 Step-by-Step Guide to Installing Pneumatic Fittings
1. Prepare the Components
Before beginning the installation, ensure all the components are clean and in good condition. Here are the preparation steps:
- Inspect the Fittings: Check that the pneumatic fittings are the correct type, size, and material for your system.
- Prepare the Tubing: Cut the tubing to the correct length, ensuring the cut is straight and clean. If the tubing is damaged or frayed, it could cause leaks or prevent a proper seal.
- Clean the Surface: If necessary, clean the ends of the tubing or pipe to remove dirt, dust, or debris that could interfere with the connection.
2. Insert the Tubing into the Fitting
The method of insertion depends on the type of fitting you’re using:
- Push-In Fittings: For push-in fittings, simply insert the tubing into the fitting until it stops. The internal mechanism will grip the tube securely. Ensure the tubing is fully inserted to prevent air leakage.
- Threaded Fittings: For threaded fittings, ensure that the threads on both the fitting and the pipe or hose are clean and free of debris. Start threading the fitting by hand, ensuring that it is properly aligned. Tighten it using the appropriate tools.
- Barbed Fittings: For barbed fittings, push the tubing over the barbs. You may need to use a hose clamp or a similar fastening method to ensure a tight and secure fit.
3. Ensure Proper Seating and Alignment
After inserting the tubing, make sure the connection is aligned correctly. This is particularly important for threaded fittings, as improper alignment can result in stripped threads or misalignment that leads to leaks.
- Push-In Fittings: For push-in fittings, you can often feel or hear a slight “click” as the tubing seats properly. Make sure the tubing is inserted all the way into the fitting to ensure a leak-proof connection.
- Threaded Fittings: After threading the fitting into place, use a wrench to tighten the fitting, but be careful not to over-tighten. Over-tightening can damage the threads or crack the fitting.
1.2 Common Tips for Ensuring a Secure Installation
1. Check the Seal
A proper seal is essential to prevent air leaks. Once the fitting is installed, check that the connection is secure and the fitting is aligned. The most common issues that lead to air leaks include:
- Tubing not fully inserted into the fitting.
- Misalignment of threads.
- O-rings or seals that are damaged or improperly seated.
2. Tighten to the Correct Torque
For threaded fittings, it’s important to tighten the fitting to the correct torque specification. Over-tightening can damage the fitting, while under-tightening can lead to leaks. Always follow the manufacturer’s recommended torque settings to achieve the best result.
3. Use the Right Tools
Using the correct tools is essential for a proper installation:
- For threaded fittings, use the right-sized wrenches or plumbing tools to avoid damage.
- For push-in fittings, you typically won’t need any tools. However, make sure you don’t force the tubing into the fitting, as this could damage the fitting or tubing.
- For barbed fittings, ensure you have the right size hose clamps to secure the tubing in place.
Using the right tools ensures a secure and leak-free connection.
1.3 Check for Leaks After Installation
After installation, it’s crucial to check for any air leaks. Leaks can result in pressure loss and inefficiency, potentially causing damage to the system. Here’s how to check for leaks:
- Visual Inspection: Look for any gaps or signs of air escaping around the fittings.
- Leak Detection Spray: Apply a leak detection fluid or spray to the connection points. If bubbles form, it indicates a leak.
- Pressure Test: If possible, conduct a pressure test on the system to verify that all fittings are secure and the system is holding pressure correctly.
1.4 Best Practices for Ongoing Maintenance
Once your pneumatic fittings are installed, it’s important to follow best practices for ongoing maintenance:
- Inspect Fittings Regularly: Periodically check the condition of fittings, hoses, and seals to ensure they are still in good condition. Look for signs of wear, corrosion, or cracks.
- Tighten Fittings When Necessary: Over time, fittings may loosen due to system vibrations or pressure changes. Check the fittings and tighten them if necessary, but be careful not to over-tighten.
- Replace Worn Fittings: If any fittings become worn, cracked, or damaged, replace them immediately to maintain the integrity of the system.
Maintenance and Troubleshooting of Pneumatic Fittings
To ensure the long-term reliability and performance of your pneumatic system, it’s important to conduct regular maintenance and address any issues that may arise with the fittings. By following proper maintenance procedures and troubleshooting common problems, you can prevent unnecessary downtime and costly repairs.
1.1 Regular Inspection and Cleaning
Regular inspections and cleaning of pneumatic fittings are essential to maintaining optimal system performance. Here’s how to keep your fittings in top condition:
1. Inspect for Leaks
Leaks can significantly reduce the efficiency of a pneumatic system and waste energy. Regularly check for any signs of air leaks around fittings. Some methods to detect leaks include:
- Visual Inspection: Look for any visible damage, cracks, or wear on fittings.
- Leak Detection Spray: Use a leak detection spray around the connections. If bubbles form, you have identified a leak.
2. Clean the Fittings
Debris, dust, or oil can accumulate over time and affect the performance of the fittings. Periodically clean the fittings by removing debris from around the connections and wiping them down with a clean, dry cloth. Make sure not to use abrasive materials that could damage the fitting surfaces.
3. Check for Wear and Tear
Inspect O-rings, seals, and other critical components for signs of wear, cracking, or deterioration. If any parts show visible damage, replace them immediately to prevent leaks or system failure.
1.2 Common Issues and Troubleshooting
Despite proper installation and regular maintenance, issues may still arise with pneumatic fittings. Here are some common problems and how to troubleshoot them:
1. Air Leaks
Air leaks are the most common issue in pneumatic systems. They can result from improper installation, damaged seals, or fittings that have become loose over time.
- Solution: Tighten fittings to the manufacturer’s recommended torque specifications. If tightening doesn’t resolve the issue, inspect the seal or O-ring for damage and replace it if necessary.
2. Low Air Pressure
If the system is experiencing low air pressure, it may indicate an issue with the fittings or the overall system. Blockages or loose fittings can restrict airflow.
- Solution: Check the fittings for any blockages or debris. Also, ensure that all connections are tight and secure. If the problem persists, check for any leaks that may be causing air loss.
3. Fitting Damage
Over time, fittings can become damaged due to wear and tear, corrosion, or extreme pressure. Damaged fittings may not provide a secure connection, leading to performance issues.
- Solution: If a fitting is cracked, corroded, or otherwise damaged, replace it immediately. Using the correct materials for the fitting, based on the operating conditions, will help minimize damage and increase the lifespan of the components.
1.3 Preventative Maintenance Tips
- Regularly Tighten Fittings: Over time, fittings can loosen due to vibrations or system pressure changes. Tighten fittings periodically to prevent leaks.
- Replace Worn Components: Seals, O-rings, and other wear-prone parts should be replaced at regular intervals, even if they don’t show visible damage.
- Monitor System Pressure: Always monitor the pressure of your pneumatic system. Excessive pressure or pressure drops can indicate issues with fittings or other components in the system.
By conducting routine inspections, performing preventative maintenance, and troubleshooting common problems, you can ensure that your pneumatic system remains efficient and reliable over time.
Choosing, installing, and maintaining the right pneumatic fittings is crucial for the efficiency and longevity of any pneumatic system. By considering factors such as compatibility, pressure ratings, and connection types, you can make informed decisions that will improve system performance and reduce downtime.
Key Takeaways:
- Correct Fitting Selection: Match fittings to your piping system, ensuring the right material, size, and connection type.
- Proper Installation: Install fittings according to manufacturer guidelines, and always use the correct tools to ensure tight, secure connections.
- Routine Maintenance: Regularly inspect and clean fittings, replace worn components, and monitor system pressure to avoid leaks and performance issues.
- Troubleshooting: Be proactive in identifying and resolving issues such as air leaks, low pressure, and fitting damage to prevent costly repairs.
By following these best practices, your pneumatic system will operate at peak performance, providing you with reliable and efficient service for years to come.