Installing a garden irrigation system can save you time and water, while ensuring your plants get the consistent care they need to thrive. Whether you have a small backyard or a sprawling garden, a well-designed irrigation system can make all the difference in maintaining a healthy landscape. Instead of relying on manual watering, an irrigation system delivers water directly to the roots, minimizing waste and maximizing efficiency.
The benefits of installing an irrigation system are numerous. It conserves water by ensuring only the necessary amount is used, helps keep plants healthy by providing them with a steady supply of moisture, and saves time by reducing the need for frequent watering. In this guide, we’ll explore the different types of garden irrigation systems, help you plan your installation, and provide a step-by-step process to get started.
Types of Garden Irrigation Systems
When choosing the right irrigation system for your garden, it’s essential to consider factors like the size of your garden, the types of plants, and your local climate. Here are the most common types of garden irrigation systems:
1. Drip Irrigation
Drip irrigation is a highly efficient system designed to water plants slowly at their root zone. This system delivers water directly to the roots of plants through emitters or drippers placed along the tubing. By doing so, it reduces water evaporation and runoff, making it ideal for areas with water restrictions or gardens with drought-resistant plants.
- Advantages: Conserves water, reduces weed growth, minimizes runoff.
- Best for: Vegetable gardens, flower beds, and container plants.
2. Sprinkler Systems
Sprinklers are one of the most common irrigation methods, covering a wide area with water. They work by spraying water over your garden, similar to natural rainfall. This system can be automated using a timer to ensure consistent watering.
- Advantages: Covers a large area, suitable for lawns and large garden spaces.
- Best for: Lawns, flower beds, and large gardens.
3. Soaker Hoses
Soaker hoses are designed to release water evenly along their length, allowing it to seep into the soil slowly. This type of irrigation is particularly useful for raised garden beds or long rows of plants. Soaker hoses can be laid directly on the soil surface or buried under mulch for added efficiency.
- Advantages: Even water distribution, easy to install, cost-effective.
- Best for: Flower beds, vegetable gardens, and areas with plants close together.
4. Automatic Systems
Automatic irrigation systems combine timers and sensors to provide precise watering schedules based on the specific needs of your garden. These systems can be used for both drip and sprinkler setups, offering a higher level of control and customization.
- Advantages: Provides convenience, customizable for different plant types.
- Best for: Larger gardens, lawns, and busy homeowners who prefer a hands-off approach.
Planning Your Irrigation System
Before installing an irrigation system, it’s important to plan carefully to ensure it meets the needs of your garden while optimizing water usage. Here are some key steps in the planning process:
1. Assess Your Garden’s Water Needs
Start by evaluating the size and layout of your garden. Are there large open areas or smaller, more specific plant zones? Different plants have different water requirements, so it’s crucial to group plants with similar needs together. For example, succulents and cacti require much less water than vegetables or flowering plants.
- Watering needs: Consider the type of plants (e.g., drought-tolerant or water-loving plants).
- Garden layout: Determine if there are shaded areas, hills, or slopes that might need special attention.
2. Map Out Your Garden Layout
Creating a map of your garden will help you visualize how to position the irrigation system for maximum efficiency. Identify key areas such as:
- Flower beds and vegetable patches
- Lawns or grassy areas
- Paths and hard-to-reach spots
This map will guide where to place emitters, hoses, or sprinklers and will help you determine the length and number of irrigation lines needed.
3. Consider Water Pressure and Flow
Water pressure and flow rate are essential factors to consider when planning your irrigation system. Too much pressure can lead to overspray or water waste, while too little can result in uneven watering.
- Pressure: Check the water pressure from your main source (tap or outdoor faucet).
- Flow rate: Estimate the volume of water your system will need to distribute based on your garden’s size.
Choosing the Right Irrigation Components
Selecting the right irrigation components ensures that your system operates smoothly and efficiently. Let’s look at the key parts you’ll need for your irrigation system.
1. Water Source
The first step is to determine your water source. Most irrigation systems connect directly to your main water supply. You can also use a rain barrel or well for a more sustainable approach.
- Main water supply: Use an outdoor faucet or spigot.
- Alternative sources: Rainwater harvesting or well water for an eco-friendly option.
2. Hoses and Tubing
Choosing the right hoses and tubing is crucial for water delivery. The size of the hose will depend on the flow rate and the distance from the water source to the plants.
- Hoses: Choose a flexible hose for easy maneuvering or reinforced hoses for heavy-duty use.
- Tubing: Tubing is typically used for drip irrigation systems. Opt for UV-resistant tubing to prevent cracking under the sun.
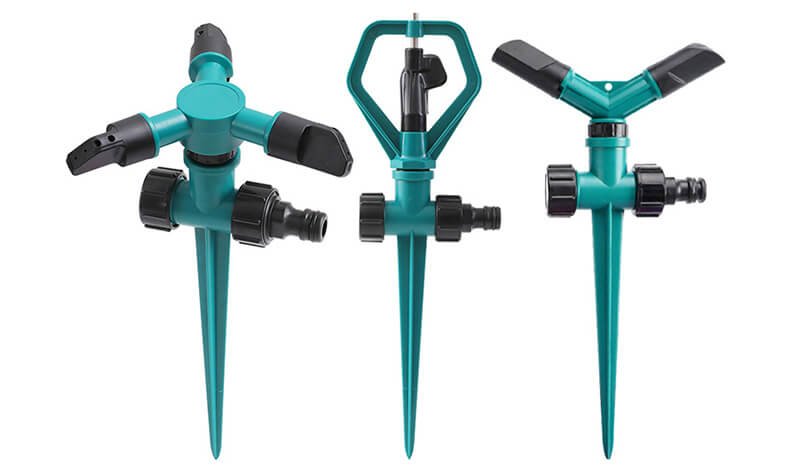
3. Emitters, Sprinklers, and Drippers
These components are the heart of your irrigation system. Emitters, sprinklers, and drippers distribute water to the plants. The choice between them depends on your garden’s layout and the plants’ needs.
- Emitters: Ideal for drip irrigation systems, they deliver water slowly to the plant roots.
- Sprinklers: Best for covering larger areas, such as lawns.
- Drippers: Perfect for delivering water directly to the base of plants in beds or containers.
4. Timers and Controllers
Installing a timer or controller can automate your irrigation system, ensuring your plants get watered consistently without manual intervention. Timers can be set to water at specific times of day, and some controllers can adjust watering schedules based on weather conditions.
- Timers: Simple devices that control when the irrigation system turns on and off.
- Controllers: More advanced systems that offer programmable schedules and weather-based adjustments.
Step-by-Step Installation Process
Installing your garden irrigation system can seem like a big task, but by following a clear, step-by-step process, you’ll be able to complete it efficiently and effectively. Here’s how to install your irrigation system, from preparation to testing.
1. Prepare the Garden Area
Before you start installing, take time to prepare your garden. This ensures that the system will work as intended.
- Clear the area: Remove any debris, large rocks, or obstructions from the garden.
- Mark the zones: Using your garden map, mark where the sprinklers, emitters, and hoses will go. Be sure to plan the paths of your hoses or tubing carefully, especially in larger gardens.
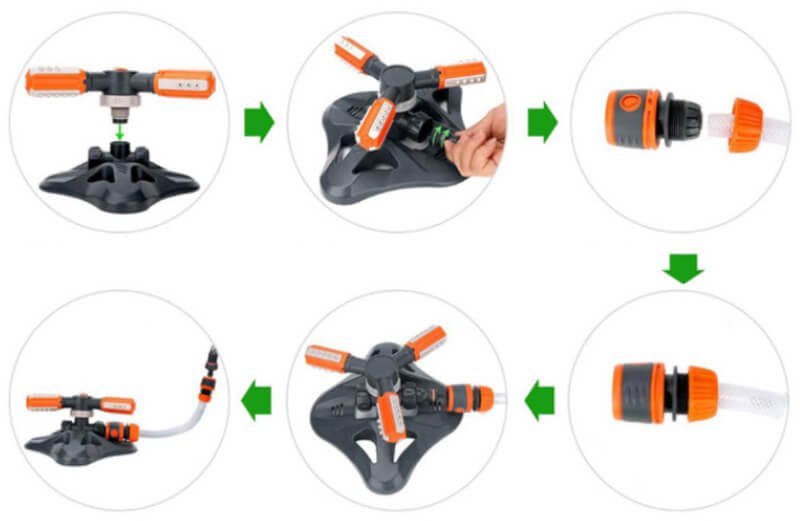
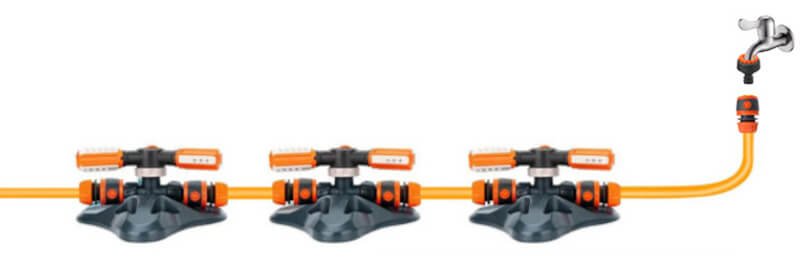
2. Install the Main Water Supply Line
The next step is to connect your irrigation system to the water source. Depending on your setup, this could be an outdoor faucet or a rain barrel.
- Connect to the faucet: Attach the backflow preventer to your faucet to ensure that water does not flow back into the supply.
- Mainline installation: Lay down the mainline hose or tubing that will deliver water to the rest of the system. Use hose fittings and connectors to ensure a secure and leak-free connection.
3. Lay Down the Hoses and Tubing
Once your mainline is in place, it’s time to lay down the hoses or tubing that will deliver water to the plants.
- Position the hoses: Place the drip tubing or hoses along the garden rows, flower beds, or lawns, following the paths marked earlier. Ensure that they reach all the plants that need watering.
- Secure the hoses: Use stakes or clips to keep the hoses in place, preventing them from shifting over time.
4. Install Emitters, Sprinklers, or Drippers
Next, you’ll install the watering devices that will actually distribute water to your plants.
- Emitters and drippers: If you’re using a drip irrigation system, insert the emitters or drippers into the tubing at the appropriate spots. These should be placed near the plant roots for efficient watering.
- Sprinklers: For larger areas, install sprinklers at regular intervals along the tubing. Make sure the spray pattern covers the desired area without creating puddles or runoff.
5. Set Up the Timer or Controller
Now that the water is ready to flow, it’s time to automate the system for convenience. Installing a timer or controller allows you to set watering schedules, ensuring your garden gets watered even when you’re not around.
- Timer setup: Attach the timer to the faucet or main water supply line. Set it according to the ideal watering times for your plants.
- Controller setup: For more advanced systems, install the controller and program it to water your garden at specific times of day. You can even set it to adjust watering based on weather conditions.
6. Test the System
Once everything is installed, it’s crucial to test the system to ensure everything is working correctly.
- Check water flow: Turn on the water and check for proper water pressure and flow. Make sure all emitters, sprinklers, or drippers are functioning.
- Adjust spray patterns: If using sprinklers, adjust the spray pattern to ensure even coverage. For drip systems, ensure that each emitter is releasing the right amount of water.
7. Make Final Adjustments
After testing, make any necessary adjustments to your system.
- Fix leaks: If you find any leaks at the connections, tighten or replace fittings.
- Reposition hoses: If some areas aren’t getting enough water, reposition hoses or add more emitters to ensure complete coverage.
Troubleshooting and Maintenance
After installing your irrigation system, it’s important to keep it in good working order. Regular maintenance and addressing issues quickly can help extend the life of your system and ensure your plants get the care they need.
1. Checking for Clogs
One of the most common issues with irrigation systems is clogs. Over time, emitters and drippers can become clogged with dirt or debris, affecting water flow.
- Inspect emitters: Regularly check each dripper or sprinkler for blockages. If you notice uneven watering or reduced water output, clean the affected parts.
- Flush the system: Periodically flush the system by turning the water on full force to clear out any buildup.
2. Fixing Leaks
Leaks can occur at connection points, causing water waste and inefficiency. To fix leaks, follow these steps:
- Inspect connections: Check all hose fittings and connectors for leaks. Tighten them if necessary or replace any faulty parts.
- Replace damaged tubing: If the tubing is cracked or worn out, replace it with new UV-resistant tubing to prevent future leaks.
3. Adjusting Water Flow
If your system isn’t providing the right amount of water, you may need to adjust the water flow or pressure.
- Adjust pressure: If using a sprinkler system, you may need to adjust the water pressure to avoid overwatering or underwatering. You can use a pressure regulator to maintain optimal pressure.
- Check emitters: For drip systems, ensure the emitters are delivering the correct amount of water to each plant.
4. Seasonal Maintenance
At the start and end of each growing season, perform regular maintenance to ensure your system is ready to go.
- Winterize your system: Before cold weather sets in, drain the system to prevent freezing. Store timers and controllers in a dry, protected area.
- Inspect after storms: After heavy rain or storms, check the system for any damage or blockages caused by debris.
Installing an irrigation system is a smart investment for any garden. It saves you time, ensures your plants are properly watered, and conserves water—making it better for both your garden and the environment. By following the steps outlined in this guide, you can easily set up a system that meets your garden’s needs and keeps it thriving year-round.