A garden hose is one of the most essential tools in any home or garden. Whether you’re watering plants, washing your car, or cleaning outdoor spaces, a reliable garden hose is crucial. However, over time, hoses can experience wear and tear, leading to issues like leaks, cracks, and broken fittings.
When a garden hose gets damaged, many people think they need to replace it entirely. But in most cases, repairing the hose is a simple and cost-effective solution. By learning how to repair your garden hose, you can extend its lifespan, saving money and reducing waste.
In this article, we will explore the most common hose problems and provide a step-by-step repair process.
Tools and Materials Needed for Repair
Before you begin repairing your garden hose, it’s essential to have the right tools and materials on hand. Below is a list of the basic tools and materials required for typical hose repairs:
1. Hose Repair Kit
A hose repair kit is a must-have for quick and easy repairs. Most kits include hose menders, connectors, and clamps. They are available in various sizes to match your hose’s diameter.
2. Scissors or Utility Knife
A pair of scissors or a utility knife is needed to cut through damaged sections of the hose. Make sure the blade is sharp enough to ensure a clean cut.
3. Hose Mender or Coupling
A hose mender or coupling is used to reconnect the two cut ends of a hose. These fittings come in a range of materials such as plastic or metal, and they help restore the hose to its original functionality.
4. Teflon Tape (for Threaded Connections)
For threaded fittings, you may need Teflon tape to create a tight seal. This will prevent leaks from forming around the threaded connections and ensure a secure fit.
5. Clamps (Optional)
In some cases, clamps can be used to hold hose menders or repair sections in place. They help ensure the repair remains intact under pressure.
6. Replacement Fittings (if Necessary)
If the hose fittings are broken or too worn out to repair, you’ll need replacement fittings. These fittings come in various shapes and sizes to match your hose and equipment.
Common Garden Hose Problems
Garden hoses are subjected to constant wear and tear, but understanding the common problems they face will help you identify issues early and prevent them from getting worse. Here are some of the most frequent problems you might encounter:
1. Leaks and Holes
Leaks are one of the most common issues with garden hoses. They can occur anywhere along the hose, usually due to wear or abrasions. Over time, sharp objects or constant bending can cause tiny holes that lead to water leakage.
2. Broken or Loose Fittings
The fittings on a garden hose can also become loose or damaged. This can cause a lack of water pressure or water spilling from the connection. In some cases, fittings might break entirely, requiring a replacement.
3. Cracks and Cuts in the Hose
Exposure to extreme temperatures, direct sunlight, or rough handling can cause a hose to crack or cut. Once cracks appear, water can easily escape, making the hose ineffective for tasks like watering plants or cleaning.
4. Kinks and Twists
Although not a leak or break, kinks and twists in the hose are a common frustration. They restrict water flow and can damage the hose over time. Kinks typically occur when the hose is stored improperly or used while tangled.
5. Bulging and Bloating
A bulging hose may be a sign that there is a blockage somewhere in the line, or that the hose is exposed to high pressure. This can lead to the hose bursting if not repaired.
Step-by-Step Repair Process
Once you’ve identified the problem with your garden hose, it’s time to repair it. Here’s a simple, step-by-step guide to fixing some of the most common issues:
Step 1: Inspect the Damage
Before starting the repair, inspect the hose carefully. Determine whether the issue is a hole, crack, or broken fitting. For leaks, you can run water through the hose to pinpoint the exact location of the problem.
Step 2: Cut Out the Damaged Section
Using scissors or a utility knife, carefully cut out the damaged portion of the hose. Ensure that the cut is clean and straight, as a crooked cut may make the repair less effective.
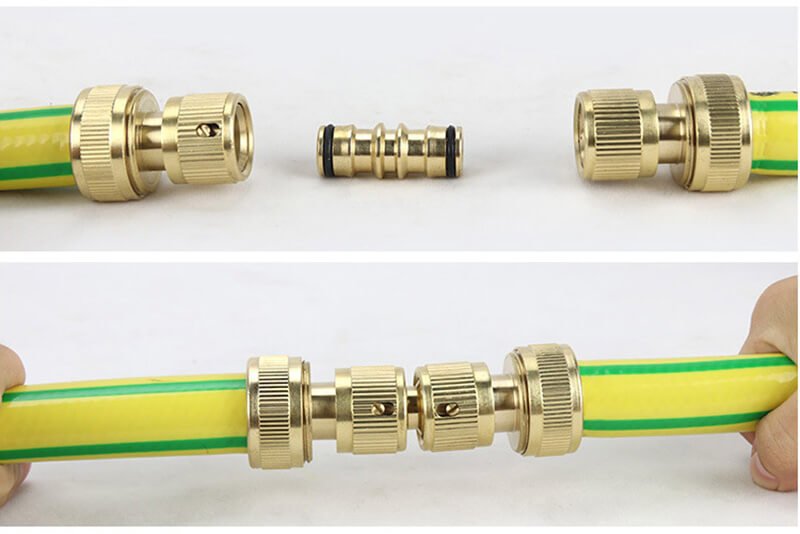
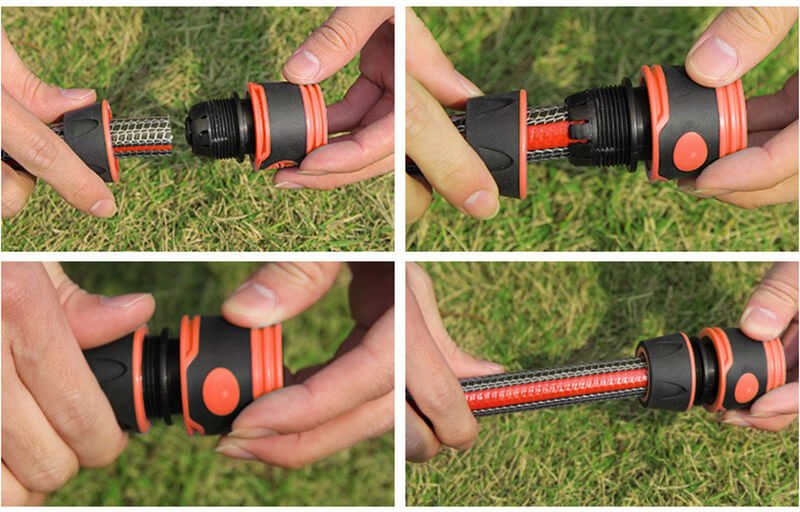
Step 3: Attach a Hose Mender or Coupling
For holes or cuts, you will need to install a hose mender or coupling. These come in two pieces that connect to either side of the cut hose. Insert the cut ends into the mender and tighten the screws to hold them securely. Make sure the mender is firmly in place to avoid leaks.
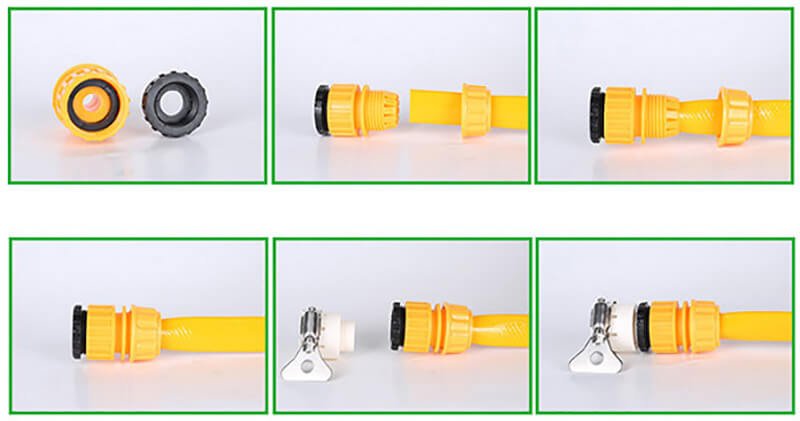
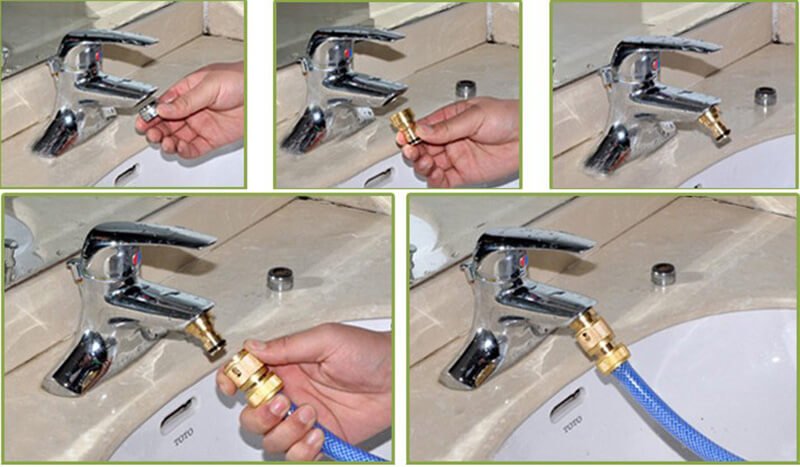
Step 4: Repair Broken or Loose Fittings
If the fitting is broken, replace it with a new one that matches the size and type of your hose. If the fitting is loose, wrap Teflon tape around the threads and screw the fitting back into place. This will create a tight seal and prevent future leaks.
Step 5: Check for Leaks
Once the repair is done, run water through the hose to check for any leaks or weaknesses. If you notice any, you may need to tighten the mender, add more Teflon tape, or adjust the fitting.
Step 6: Prevent Future Damage
After the repair, take steps to prevent further damage. Store the hose properly by coiling it neatly and keeping it out of direct sunlight. Always check the hose for signs of wear before use.
Prevention Tips
While it’s great to know how to repair a garden hose, preventing damage in the first place is the best way to extend its lifespan. Here are some helpful tips to keep your garden hose in good condition:
1. Proper Storage
Always store your garden hose properly when it’s not in use. Avoid leaving it coiled tightly, as this can lead to kinks and cracks. Instead, store the hose loosely or use a hose reel to keep it tangle-free and in good shape.
2. Avoid Exposure to Extreme Temperatures
Excessive heat or cold can cause your hose to degrade faster. When possible, store your hose in a shaded area, and avoid leaving it in direct sunlight for extended periods. In winter, make sure to drain the hose and store it in a warm, dry place.
3. Check for Kinks
Before using your hose, always check for kinks or twists that could block water flow. If you find any, straighten the hose out to avoid putting unnecessary pressure on it. Kinks can cause internal damage over time if not addressed.
4. Avoid Sharp Objects
Be cautious around sharp edges or rough surfaces that could puncture the hose. When using the hose in the garden or near hard surfaces, try to avoid dragging it over rocks, sticks, or tools.
5. Use the Right Water Pressure
High water pressure can strain your hose, especially at weak points like the fittings. Make sure to use a pressure regulator if necessary to avoid over-pressurizing the hose.
When to Replace Your Garden Hose
While regular repairs can extend the life of your garden hose, there are times when it’s best to replace it entirely. Here are some signs that indicate it’s time for a new hose:
1. Frequent Repairs
If you find yourself constantly repairing the hose, it may be a sign that it’s reaching the end of its life. Repeated issues, such as cracks, holes, and broken fittings, can be a hassle to fix and may lead to inefficiency.
2. Severe Cracks or Damage
If the hose has extensive cracking, bulging, or deep cuts that can’t be repaired, it may be time to replace it. Severe damage compromises the hose’s functionality and can lead to water wastage.
3. Loss of Flexibility
A hose that’s become stiff or brittle due to UV damage or old age is no longer as effective or safe to use. A stiff hose is more likely to crack, kink, or leak, making it difficult to store and use.
4. Poor Water Flow
If your hose is restricting water flow despite repairs and proper maintenance, it may be time to upgrade. A damaged hose can obstruct water flow, affecting your gardening or cleaning tasks.
Conclusion
Repairing your garden hose can be a simple and rewarding task, helping you save money and extend the life of your equipment. By following the step-by-step repair process, you can fix common issues like leaks, cuts, and broken fittings quickly and easily.
However, prevention is always better than cure. By storing your hose properly and following simple maintenance tips, you can reduce the chances of damage and avoid frequent repairs. And when the time comes to replace your hose, keep an eye out for signs like frequent repairs, severe cracks, or a loss of flexibility.