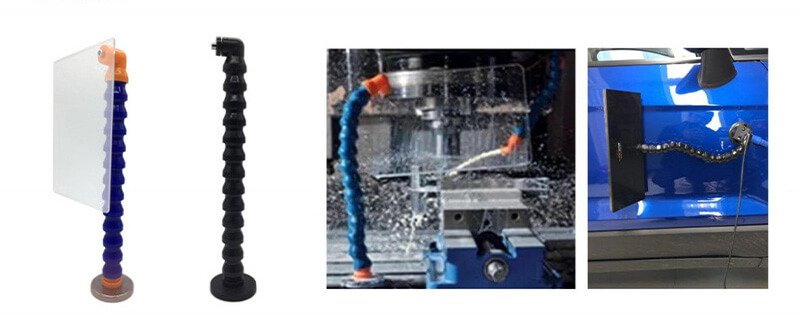
Replacing a flexible CNC coolant hose may seem like a small task, but it plays a vital role in keeping your CNC machine running smoothly. These hoses are essential for directing coolant to the machine’s critical components, preventing overheating, and ensuring optimal performance. Over time, due to wear and tear, these hoses can degrade, leading to leaks, cracks, or restricted coolant flow. Knowing how to replace the flexible CNC coolant hose properly can save you from costly repairs and downtime.
In this article, we’ll guide you step-by-step through the process of replacing the flexible CNC coolant hose, ensuring your machine stays in top working condition.
Signs That Your Flexible CNC Coolant Hose Needs Replacement
It’s important to regularly inspect your flexible CNC coolant hoses to catch potential issues early. Here are some common signs that indicate the hose may need to be replaced:
1. Leaks or Drips
If you notice coolant pooling under the hose or find wet spots around its connections, it’s a sign that the hose is leaking. Leaks can lead to insufficient coolant flow, which could damage your CNC machine.
2. Cracking or Hardening
Over time, hoses may become brittle and crack. This is particularly common in older hoses or those exposed to harsh conditions. Cracks and hardening make the hose more prone to breaking, leading to system failure.
3. Kinks or Severe Bends
Hoses that are severely kinked or bent can obstruct the flow of coolant. If the coolant cannot circulate properly, the machine will overheat, leading to performance issues or even equipment failure.
4. Deterioration from Chemicals
Exposure to certain chemicals used in the coolant can cause the hose material to deteriorate. Over time, this can weaken the hose, causing it to lose its effectiveness and ultimately need replacement.
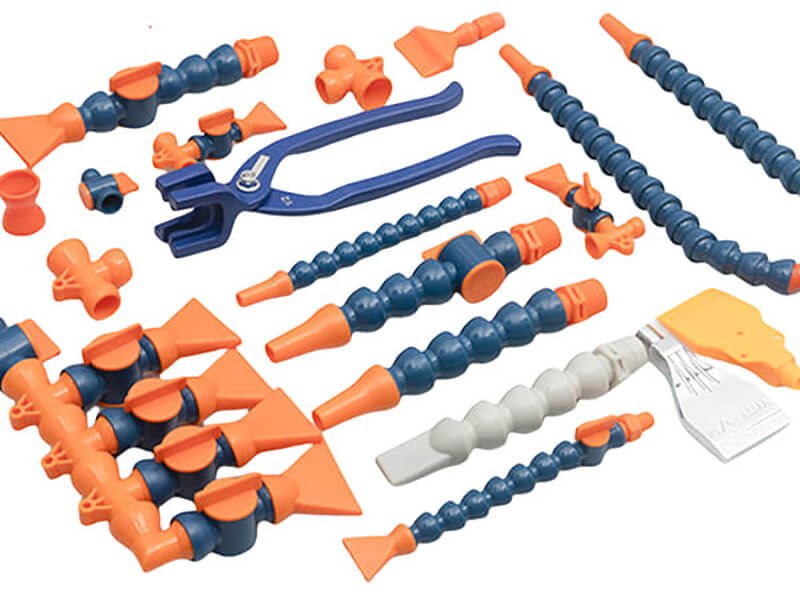
Tools and Equipment Needed for Replacing the Hose
Before you start replacing the flexible CNC coolant hose, it’s important to gather the right tools and equipment. Having everything you need on hand will make the process smoother and more efficient.
Essential Tools
- Wrench or Pliers: To loosen and tighten hose fittings and clamps.
- Pipe Cutter or Scissors: To cut the new hose to the required length.
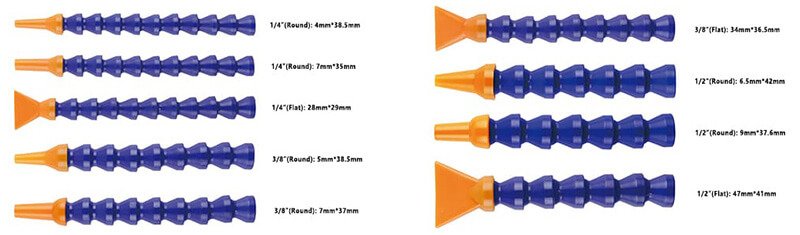
- Replacement Flexible CNC Coolant Hose: Ensure the new hose matches the specifications of the old one (size, material, and length).
- Clamps: To secure the hose in place after installation.
Safety Equipment
- Gloves: Protect your hands from sharp edges or debris when handling the hose.
- Safety Glasses: To protect your eyes from any coolant splashes or debris.
By having the proper tools and equipment ready, you can ensure a smooth and effective replacement process.
Step-by-Step Guide to Replacing the Flexible CNC Coolant Hose
Replacing the flexible CNC coolant hose is a straightforward process if you follow the correct steps. Here’s a step-by-step guide to help you complete the replacement efficiently and safely.
1. Turn Off the CNC Machine and Disconnect the Power
Before starting any work on your CNC machine, ensure it is powered off. Disconnect the machine’s power supply and any coolant flow systems to prevent accidental starts and spills. Always prioritize safety first.
2. Drain the Coolant System
Next, drain the coolant from the system. This step prevents coolant from spilling when you remove the hose. Locate the drain valve or coolant reservoir and carefully drain the liquid into a suitable container.
Be sure to follow your machine’s coolant disposal procedures, as some coolant types may require special handling.
3. Remove the Old Flexible Coolant Hose
Once the system is drained, it’s time to remove the old hose. Start by loosening the hose clamps at both ends of the hose. You may need a wrench or pliers to loosen the clamps.
After the clamps are loosened, gently pull the hose away from the fittings. If the hose is stuck, you can use a little force to break it free, but be careful not to damage the surrounding components.
4. Prepare the New Hose
Now that the old hose is removed, it’s time to prepare the new one. Measure the required length and cut the new hose accordingly using a pipe cutter or sharp scissors.
Make sure the new hose matches the diameter of the old hose and fits snugly on the connectors. Some hoses may require specific fittings, so double-check the specifications for your CNC machine.
5. Install the New Hose
With the new hose prepared, begin the installation process. Slide the new hose onto the appropriate connectors on both ends. Ensure that the hose is aligned properly to avoid any twisting or kinking.
Secure the hose with hose clamps at each end. Tighten the clamps using a wrench or pliers, but be careful not to over-tighten, as this could damage the hose or the connectors.
6. Reconnect the Coolant System and Test
Once the hose is installed, reconnect the coolant system and refill it with the appropriate coolant fluid.
After the system is filled, power on the CNC machine and run it for a short period. Check for leaks around the hose and connectors. If you notice any coolant dripping, tighten the clamps further. Ensure that the coolant is flowing properly and that there are no blockages or issues with the new hose.
Common Mistakes to Avoid When Replacing the Hose
Replacing the flexible CNC coolant hose is simple, but there are a few common mistakes you should avoid to ensure a smooth and successful replacement.
1. Over-tightening Hose Clamps
One common mistake is over-tightening the hose clamps. While it’s important to secure the hose properly, over-tightening can damage the hose or cause the fittings to crack. Tighten the clamps enough to create a secure seal, but avoid excessive force.
2. Using the Wrong Hose Size
It’s essential to use the correct size of hose to ensure a proper fit. Using a hose that’s too small or too large for the fittings can lead to leaks, poor coolant flow, or damage to the hose. Always measure and check the specifications before purchasing a replacement hose.
3. Forgetting to Check for Leaks
After replacing the hose, make sure to test the system thoroughly. Many people forget to check for leaks around the new hose, which can lead to coolant loss and machine damage. Run the machine for a short time and check all hose connections carefully.
4. Not Draining the Coolant Properly
Failing to drain the coolant before starting the replacement can cause spills and mess. Always ensure the coolant is drained from the system before removing the old hose to avoid unnecessary cleanup and mess.
Maintenance Tips for Prolonging the Life of Flexible CNC Coolant Hoses
To get the most out of your flexible CNC coolant hose and extend its lifespan, it’s important to perform regular maintenance and care. Here are some tips to help you keep your hoses in top condition:
1. Regular Inspections
Inspect the hoses regularly for signs of wear and tear, including cracks, kinks, or bulges. Early detection of issues can help you replace the hose before it fails, preventing machine damage and downtime.
2. Avoiding Excessive Bending
Hoses are flexible, but they still need to be handled with care. Avoid sharp bends or twisting the hose, as this can cause stress and damage to the material. Always install the hose with smooth curves and ensure it is not overstretched.
3. Keeping the Hoses Clean
Over time, coolant can leave residue inside the hoses, especially if the coolant contains particles or oil. Clean the hoses periodically by running clean water or a specialized cleaning solution through the system to prevent clogs and keep the hose material in good condition.
4. Protecting the Hoses from Chemicals
Some coolants and chemicals can deteriorate the hose material over time. If your CNC machine uses chemicals in the coolant, ensure the hose material is compatible and check for signs of damage regularly.
Conclusion
Replacing and maintaining the flexible CNC coolant hose is an essential task that ensures your CNC machine operates efficiently and without interruptions. By following the step-by-step guide provided, you can easily replace the hose when necessary and avoid common mistakes that can lead to issues.
Regular maintenance and inspections are key to extending the life of the hoses and preventing future problems. By keeping the coolant system in good condition, you’ll avoid costly repairs and keep your CNC machine running at its best.