Installing a Garden Hose Quick Connect Set is a simple yet effective way to enhance your gardening experience. Whether you are watering plants, cleaning outdoor areas, or filling up a pool, a quick connect set can save you time and effort by allowing you to easily attach and detach your garden hose.
No more struggling with unscrewing and reattaching fittings! A quick connect set enables you to attach your hose to the faucet with just a simple click, offering convenience and efficiency. In this article, we will walk you through the benefits of using a quick connect set, as well as how to install it properly for optimal use.
Understanding Garden Hose Quick Connect Sets
What is a Garden Hose Quick Connect Set?
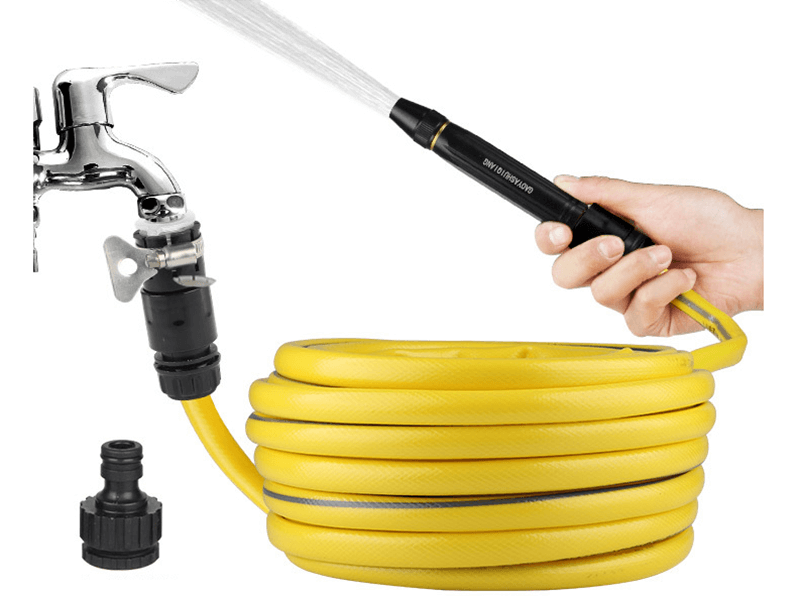
A Garden Hose Quick Connect Set is a tool designed to make the connection between your hose and faucet easier. It typically consists of two main parts: the male connector, which attaches to the faucet, and the female connector, which connects to the hose.
These two parts are designed to fit together with a simple push or click, enabling you to quickly attach or detach the hose without the need for tools or excessive twisting. The system is built for convenience, particularly when you frequently move between different watering tasks.
Benefits of Using a Quick Connect Set
Using a quick connect set has several advantages:
- Time-saving: Connecting and disconnecting the hose becomes a hassle-free task.
- Less wear and tear: Over time, constant twisting and turning can damage both the faucet and the hose. A quick connect set minimizes this damage by providing a secure and consistent connection.
- No mess: You can easily disconnect the hose without spilling water or dealing with any leaks.
- Flexibility: Many quick connect sets come with additional features like adjustable flow control, allowing you to customize the water pressure to your needs.
Types of Quick Connect Sets
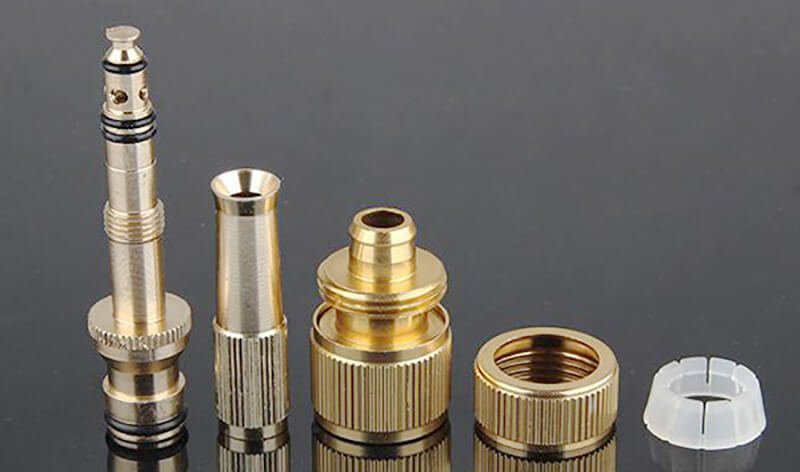
Quick connect sets come in various sizes and materials. Some sets include additional features like flow control valves or adaptors for different hose sizes. When selecting a quick connect set, consider the material (usually brass, plastic, or stainless steel) and ensure it is compatible with your garden hose and faucet.

Tools and Materials Needed
Before you begin the installation, gather the following tools and materials to ensure a smooth process:
Tools Required:
- Pliers or Wrench: To tighten connectors onto the faucet and hose.
- Tape (Optional): For extra sealing, especially if there are any leaks after installation.
Materials Needed:
- Quick Connect Set: This includes the male connector (for the faucet) and female connector (for the hose).
- Garden Hose: Make sure the hose is in good condition and the correct size for the quick connect set.
- Faucet Adapter (if necessary): If your faucet does not have the standard threads needed for the quick connect set, you may need an adapter.
Having these materials and tools on hand will ensure that the installation process is quick and hassle-free.
Step-by-Step Installation Process
Installing a Garden Hose Quick Connect Set is a straightforward task that only requires a few steps. Follow this guide to ensure your quick connect set is installed correctly and works perfectly.
Step 1: Prepare the Hose and Faucet
Before beginning the installation, disconnect your hose from any existing faucet or water source. This will prevent any water flow while you work.
- Inspect the Hose: Check for any damage or leaks in the hose. If there are any cracks or worn-out areas, now is a good time to replace the hose.
- Inspect the Faucet: Make sure the faucet is clean and free from debris. If necessary, clean the faucet threads to ensure a tight fit.
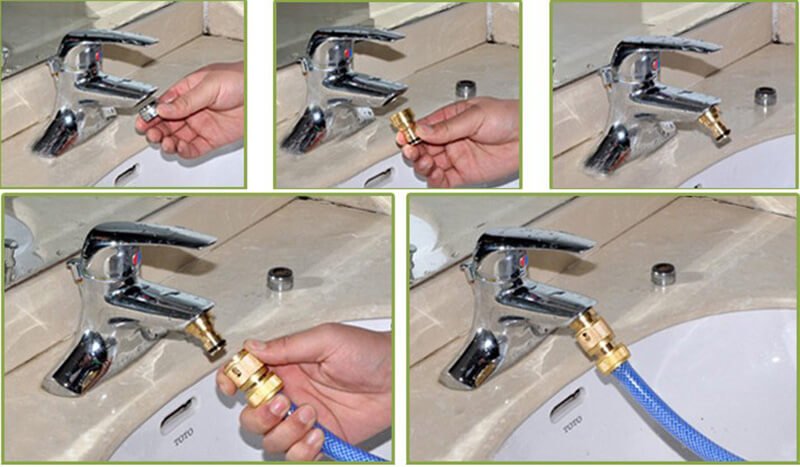
Step 2: Attach the Male Part of the Quick Connect Set to the Faucet
The male connector is the part that attaches to the faucet. Follow these steps to securely attach it:
- Screw the Male Connector onto the Faucet: Take the male part of your quick connect set and thread it onto the faucet. Turn it clockwise until it’s snug.
- Tighten the Connection: Use a wrench or pliers to gently tighten the connector. Be careful not to overtighten, as this could damage the threads or the faucet.
Step 3: Attach the Female Part to the Hose
Now it’s time to attach the female connector to the garden hose:
- Screw the Female Connector onto the Hose: Take the female connector and thread it onto the end of the hose. Make sure it fits snugly and securely.
- Tighten the Connection: Use your pliers or wrench to tighten the connection, ensuring there are no loose fittings. Again, avoid overtightening to prevent damage.
Step 4: Connect the Male and Female Parts
With both connectors in place, you can now connect the male and female parts:
- Align the Connectors: Line up the male and female parts of the quick connect set. Ensure they are positioned correctly before connecting.
- Click or Push the Connectors Together: Push the connectors together until you hear a click or feel them securely snap into place. This ensures the hose is properly attached to the faucet.
Step 5: Test the Connection
Now that your quick connect set is installed, it’s important to test the connection to ensure everything is working properly:
- Turn on the Water: Slowly turn on the faucet and check the connection.
- Look for Leaks: Inspect the connectors for any signs of water leakage. If you notice any leaks, turn off the water and re-tighten the connectors. You may also want to apply some Teflon tape to the threads for a tighter seal.
- Check the Hose Function: Once the water is running properly without leaks, test the hose by spraying water to ensure the pressure is as expected.
Common Issues and Troubleshooting
Even though installing a Garden Hose Quick Connect Set is relatively simple, you may encounter some common issues during or after installation. Here are some problems you might face and how to troubleshoot them.
Leaking Connections
One of the most common problems is leaks around the connectors. If you notice water dripping from the connection points, it may be due to a few reasons:
- Loose Connections: If the connectors are not tightened enough, they may leak. Ensure the male and female parts are securely tightened with pliers or a wrench, but avoid overtightening.
- Worn-out Seals: Over time, the rubber seals inside the quick connect set may wear out. If you notice a leak, check the seals and replace them if necessary.
- Thread Issues: If the faucet or hose threads are damaged, they may cause a poor seal. You can try using Teflon tape on the threads to improve the seal and prevent leaks.
Difficulty Connecting the Parts
Sometimes, the male and female connectors may not align properly or may be hard to connect:
- Misalignment: Ensure the connectors are aligned correctly before attempting to connect them. If the connectors aren’t aligning, check for any debris or damage inside the connection points.
- Build-up of Debris: If there is debris or mineral buildup in the connectors, it may prevent them from connecting smoothly. Clean the connectors and ensure they are free from dirt.
Low Water Pressure
If you notice a significant drop in water pressure after installing the quick connect set, it could be due to:
- Clogged Connectors: If dirt or debris has gotten into the connectors, it can restrict water flow. Clean the connectors and check for blockages.
- Faulty Quick Connect Set: In rare cases, the quick connect set itself may be defective. If cleaning doesn’t solve the issue, consider replacing the set.
Noisy Water Flow
A sudden loud noise or banging sound when the water is turned on may indicate an issue with air in the system or pressure changes:
- Air Trapped in the System: Air can get trapped in the hose and connectors during installation. Try turning on the water fully and letting it run for a few minutes to release any air.
- Pressure Problems: If the water pressure is too high, it may cause the connectors to vibrate or create noise. Check the water pressure and adjust if necessary.
Conclusion
Installing a Garden Hose Quick Connect Set is a fantastic way to simplify your gardening tasks and make your outdoor water use more efficient. By following the step-by-step installation guide, you can easily set up the system and enjoy the benefits of quick and hassle-free connections.
In case you encounter any issues, common problems like leaks, difficulty connecting the parts, or low water pressure can usually be resolved with a few simple troubleshooting steps. Regular maintenance and care will also help extend the lifespan of your quick connect set and keep it functioning smoothly.